
This article shows an example of how to use Spring Security 4 to secure Spring MVC application. UserDetailsService is implemented using Hibernate. It also explains how to lock a user after some number of unsuccessful login attempts. Complete source code (maven project) is available at the end of this article.
Features
Here is the list of all the features of this application:
- User must be authenticated to access application
- Admin page should be accessible only for users with Admin role
- User account should be locked after 5 unsuccessful login attempts
- User should get error message for failed login attempt
- Capture the last login date and time
- Logout
Technology Stack
The technology stack used for this:
- Spring Framework (MVC) – 4.2.5.RELEASE
- Spring Security – 4.0.4.RELEASE
- Hibernate – 4.3.11.Final
- Database – PostgreSQL – 9.4
- Server – Tomcat – 7
- JDK – 7
Basic Spring application Configuration
Now start the configuration. Since its a web application we will start with web.xml. As we are using Spring MVC, DispatcherServlet should be configured. We will be keeping all configuration files in classpath so need to mention the path of bean configuration file in “init-param”. To allow each request made to the application verified by security we need to configure springSecurityFilterChain with “/*” as URL pattern. Both configurations should be as shown below:
The “spring-mvc-servlet.xml” contains the following information:
- Package path for component scan where annotation based beans are present
- Configure application.properties and resource bundles
- Configure viewResolver
- Import any other configuration file
We are using Reloadable resource bundle and using only one file. But you can use multiple resource bundle files by adding an entry in list > value under “basenames”. We will be keeping all the configuration regarding hibernate, transaction manager and spring security in a separate XML file and these files need to be imported in “spring-mvc-servlet.xml” to load those configurations.
The “spring-mvc-servlet.xml” will be as follows:
Web Layer
The web layer includes JSP pages and controller which will handle add the request. The login page will be as follow:
Two things to note here. To display an error message on failed authentication we are using message stored in session attribute “SPRING_SECURITY_LAST_EXCEPTION“. You don’t have to set the error message yourself, Spring Security will set it for us.
The second thing is CSRF(Cross Site Request Forgery) token. In Spring Security CSRF is enabled by default. As it’s a good thing to have, we are not going to disable it. The hidden input at the end ${_csrf.parameterName} has been added to include the token value in our request.
Homepage and Logout
Homepage will be displayed after successful login. It contains the link to the Admin page and a Logout button. Note that for Logout we have used Spring’s tab lib (form element), so we don’t have to include the hidden input element for CSRF token. Spring’s tag lib will take care of it.
Spring Security Configuration
Now we start configuring the security of the application. It will be in separate configuration file “spring-security.xml”. Following information is configured in it:
- Define URL pattern to user role mapping
- Define login, logout, error pages
- Handlers to perform required tasks after successful or unsuccessful login
- Authentication Manager, provider which actually authenticates users
File contents are as follow:
In above file, we have three URL patterns. The first is for the login page. As everyone should have access to it, “access” attribute is set to “permitAll”. Second is for admin users. URLs of all pages which should be accessible to Admin users should start with “admin” so the “access” attribute is set as “hasRole(‘ROLE_ADMIN’)”. Lastly, we have configured URL pattern of all the pages for ROLE_USER. As every user will be having a default role ROLE_USER (in addition to another role like Admin) this will make sure that unauthenticated users won’t be able to view any page.
In the “form-login” configuration we have set two handles. customAuthenticationSuccessHandler and customAuthenticationFailureHandler they will be used to perform any operation post authentication based on success or failure. As per our requirement, we need to log the last login date and time, so this can be performed in customAuthenticationSuccessHandler. Also, if authentication failed more than 5 times due to incorrect password, we need to lock that user account, and this can be done in customAuthenticationFailureHandler.
At the end, we are configuring the Authentication manager and provider. Here we just refer the UserSerivce bean which performs the authentication and returns the object of org.springframework.security.core.userdetails.UserDetails. This can be done by implementing the loadUserByUsername method of UserDetailsService interface provided by Spring Security as shown below:
Database tables and Model Classes
The structure of database tables with master data and respective model classes is as follow:
DAO Layer
We are using Hibernate for database operations. We have imported dao-context.xml in spring-mvc-servlet.xml earlier. It contains configuration for all database related tasks like datasource, transaction manager, session factory. The actual DAO operations will be performed by DAO classes. Instead of repeating all CRUD operation tasks in each table’s DAO we are writing an Abstract DAO. It will follow Generic Dao pattern and do all CRUD operations for each entity classes. The Generic DAO is explained in more detail at Generic DAO in Hibernate. Check the code for DAO layer:
Custom error messages
Spring security has its own error messages to be displayed on unsuccessful login. But if you have to override them then you have mentioned your messages in resource bundle file configured in spring-mvc-servlet.xml as follow:
Running the application
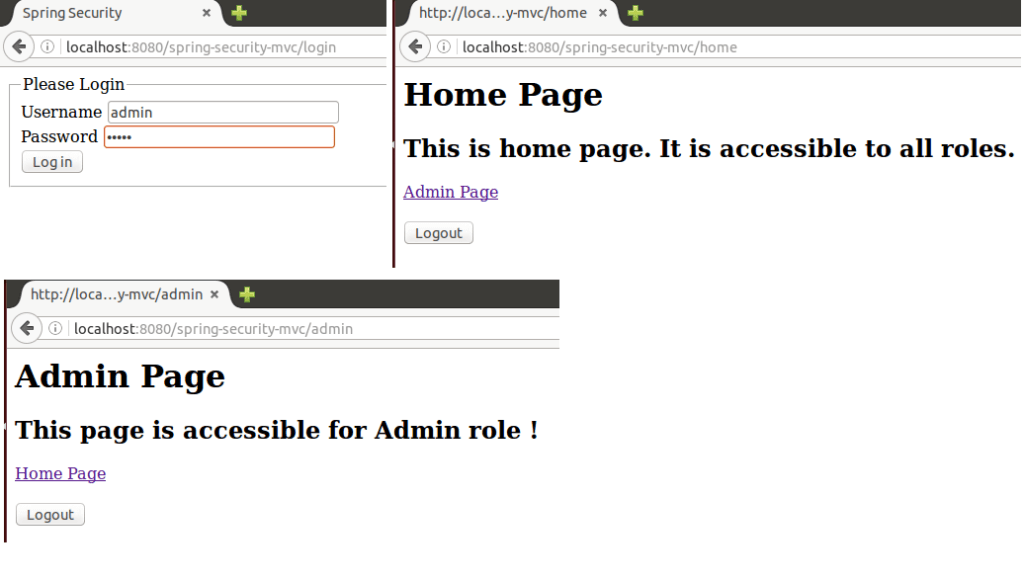
After deploying the application on tomcat run it by entering http://localhost:8080/spring-security-mvc/login in the address bar. In our database script, we already added two users, ‘bytestree’ and ‘admin’. Password for both of them is ‘12345’. Let take a look at few screenshots:
Login by ‘bytestree’ user which has ‘ROLE_USER’ role:

Login by ‘admin’ user which has ‘ROLE_USER’ and ‘ROLE_ADMIN’ role:
Error message on incorrect credentials and when an account gets locked after 5 failed login attempts:

Source Code
The complete source code is available at GitHub (keep java compilation level to 1.7).