
This article shows an example to create RESTful Web Service to perform CRUD operations using Spring Boot framework. We will be developing a complete Spring Boot Web Application exposing REST API to create, update and delete data in database.
Overview
RESTful web services are based on REST architecture which uses HTTP as a communication protocol. A RESTful Web Service is nothing but a set of exposed web resources identified by URIs. Standard HTTP methods like GET, PUT, DELETE and POST are used to access and manipulate these web resources. If you are familiar with SOAP web services then a thing to note that RESTful web service does not have any contract of operations, hence no WSDL.
RESTful Web Services Unit Testing with Spring Boot
RESTful Web Services Integration Testing with Spring Boot
RESTful Web Services Authentication and Authorization
Spring Data JPA Projections – 5 ways to return custom response
HTTP Methods
The below table shows the mapping of CRUD operation and HTTP method:
| CRUD Operation | HTTP Method |
|---|---|
| Create | POST |
| Read | GET |
| Update | PUT |
| Delete | DELETE |
Video Tutorial
If you want to see a demo for a quick start to create RESTful Web Services in Spring Boot, below video tutorial is suitable for you. Continue reading further if you want more details.
Technology Stack
Technology stack used in this example is:
- Spring Boot 1.4.1.RELEASE
- Spring Data JPA
- Database – PostgreSQL
- JDK 8
Project Setup
As we are using Spring Boot, project configuration is very straightforward. We don’t even need a web server to host our RESTful Web Services as Spring Boot has embedded Tomcat Server. Let’s start with the pom.xml first.
pom.xml
Mains things to configure here are:
- spring-boot-starter-parent
- Dependencies
- Spring Data JPA
- Spring Boot Web Starter
- Database libraries for PostgreSQL
application.properties
In this mention following things:
- ContextPath of Web Service – /rest
- database connection details
- Spring JPA configuration
- Logging level of application
We want hibernate to create database tables on startup so we configure spring.jpa.hibernate.ddl-auto=update in application.properties.
Application.java
This class loads all configuration, libraries and starts the application. It has @SpringBootApplication annotation which is equivalent to using@Configuration, @EnableAutoConfiguration and @ComponentScan with their default attributes.
Restful Web Service
Now its time to write restful web service class. It’s nothing but simple Spring Controller class having @RestController annotation at the class level. First, let’s take a look at the code. The explanation on annotation and methods is after that.
Request Mapping
The @RequestMapping annotation is used at the class level and method level. The class level annotation defines the path(“/employee“) for which this controller is used. Since we have “/rest” as application context path, any request with “/rest/employee” will handle by this controller.
Each method in this class performs one CRUD operation. In method level @RequestMapping annotation RequestMethod(or HTTP Method) parameter is set. It defines a CRUD operation performed by this method. It is set according to the mapping table in Overview > HTTP Methods section of this post.
It is always better to validate your request object before stating to process it. Check RESTful Service request bean validation for more details.
Response
You may have observed that every method is returning ResponseEntity. ResponseEntity represents HTTP response returned from these methods. It contains status code, headers, and body of the response. In our example, we are just setting the Status code and body. In some method, we don’t have to send any object as a response. For those cases, we just set the body as Void within ResponseEntity. The Status code is set as per the response received from Service layer (EmployeeService). Which status code to set is pretty self-explanatory.
Service Layer
The service layer in this example is performing CRUD operations using DAO layer. The CRUDService interface has all methods for CRUD operations. Entity class should be defined to use this interface. In our case, EmployeeService extends this interface with Employee as entity class. DefaultEmployeeService is a concrete class implementing EmployeeService interface. In all cases, service method simply calls a required method in DAO layer.
DAO Layer
We are using Spring Data JPA for dao operations which makes all DAO operations very easy. We just have to create a repository interface for each entity and extend it to JpaRepository. No need to write or implement any method. Spring Data JPA will take care of it. The database connection and other configuration is already present in application.properties file. Isn’t it so easy? You can explore more on Spring Data JPA to know all advantages it provides over normal hibernate DAO implementation.
Running the Application
Before running the application make sure database connection details are correctly mentioned in application.properties file. You don’t have to create any table. The configuration we are using will create it if not exists.
To run the application you just have to run the Application.java file. If you are using Eclipse IDE, you can run the Application.java by right click > Run As > Java Application. You don’t have to deploy it on tomcat and start the server. Sprint Boot has embedded tomcat. As you run the application it will take care of everything.
Testing with Postman
We are now ready to test our Restful Web Service. We will use Postman chrome app for testing. If you don’t have it already installed in your Chrome browser then please install it first.
Create/Add Data
To add data you need to send a POST request to http://localhost:8080/rest/employee/. The body of this request is as follows:
{
"firstname": "Bytes",
"lastname": "Tree one",
"designation": "Developer",
"salary": 10000
}
For all operations, we need to set the Header “Content-Type ” to “application/json “.
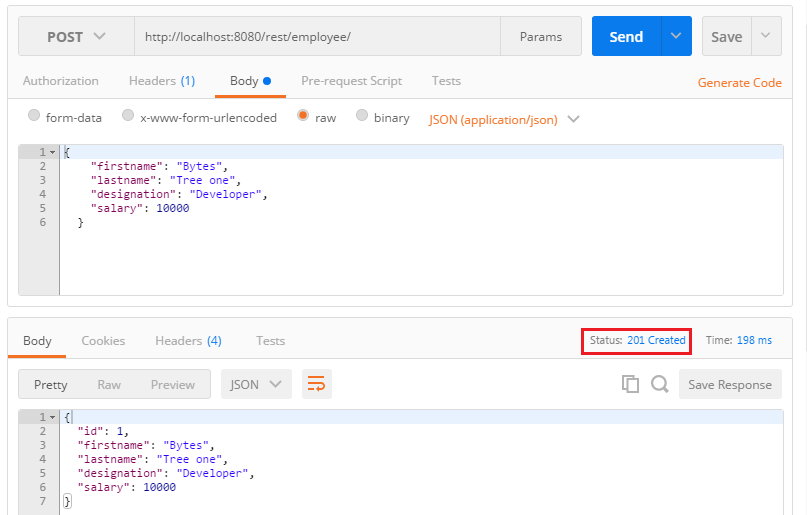
Restful Web Service – Create
Read Data
For this, you need to send GET request on http://localhost:8080/rest/employee/. No Body need to set here (still need to set Header).

Restful Web Service – Read
Update Data
For this, you need to send PUT request on http://localhost:8080/rest/employee/. The Body should be the updated request with “id” set to ID of employee we want to update.

Restful Web Service – Update
To see the updated data, run the Read Data operation again.
Delete Data
For this, you need to send a DELETE request to http://localhost:8080/rest/employee/1 . Here the “1” at the end indicates the ID of employee you want to delete.
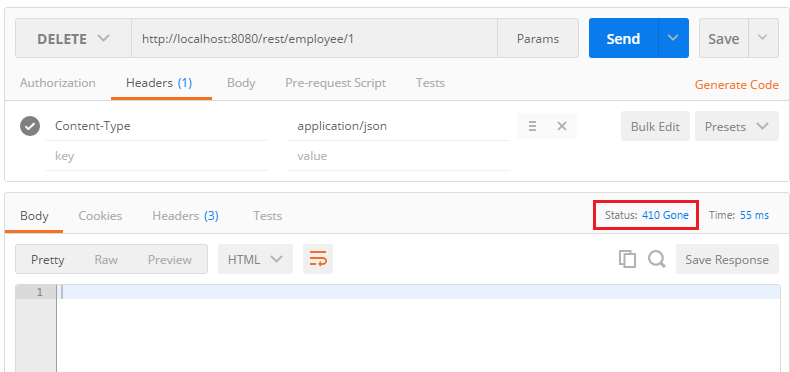
Restful Web Service – Delete
Source Code
The complete source code (maven project) is available on GitHub.
Next Step
Learn how to
- Unit Test RESTful Web Services
- Unit Test RESTful Web Services with Junit 5 and Spring Boot 2
- Secure RESTful Web Services