

Introduction
Java Platform Module System (JPMS) is one of the major feature in Java 9. This will change the way we write and publish our code/ libraries going forward. This tutorial is about modules in Java 9. It explains what is Java 9 module, why we need it and how to create and use a module.
Why We Need Modules
Any new feature is made to improve or solve problems with the existing system, module system is not an exception. It is introduced to address following problems in existing JDK:
- Any application can have some set of classes which need to interact/expose to external applications and some are not. There is no way to protect a group of classes(like package) from external systems.
- No strong encapsulation, a “public” class is open to everyone.
- No way to use only selective features of JDK.
- Some jar files in JDK are too big for small devices and applications.
It will be better if we can group set of classes in packages. Define which are open to the external world and which should remain protected.
What is Module?
Generally when we say “module”, it is an independent unit of application which represents or responsible for single feature/functionality. This is mostly true with Java 9 Module as well. But it has its own characteristics. A Java 9 module contains:
- Name: To uniquely identify it
- Dependencies: Other modules on which it depends on
- Exported packages: Packages which are open for external application
Description of the module by openjdk:
A module is a named, self-describing collection of code and data. Its code is organized as a set of packages containing types, i.e., Java classes and interfaces; its data includes resources and other kinds of static information.
To declare a module you need to add module-info.java at the root of source code. The template of module-info.java is:
module <module-name> {
    requires <module-name1>;
    requires <module-name2>;
    ...
    exports <package-name1>;
    exports <package-name2>;
    ...
    exports <package-name> to <module-name1>
}
Name
Name is very important characteristic of a module. The modular system identifies a module by name, so it must be unique. The best practice is to use the reverse domain naming scheme currently used for package names, like com.bytestree.examples .jpms.
requires
The requires clause is to define dependencies. It defines an external module on which current module is depends on. You need to have separate requires entry for each dependent module in your module-info.java .
JDK 9 has java.base module known as base module. This is an independent module which doesn’t require any other module. You don’t have to specify it using requires clause in your module, it is available by default. It is similar to java.lang package which we don’t have to import and still available for all classes.
exports
The exports clause is to define packages current module exports. Exported packages are open for other modules to use. You need to have separate exports entry for each exported module in your module-info.java .
exports to
The exports .. to .. clause is to export a package only to specific modules rather exporting it for everyone. This offers better security as you decide who should access exported package.
opens and opens to
In case you want to allow other modules to access classes in certain packages at runtime through reflection, opens clause is useful. To allow only specific modules to access these packages, you should use opens to . Syntax is as follows:
opens <package-name>;
opens <package-name> to <module-name>;
You can also “open” entire module for reflection rather than a specific package.
open module <module-name>{
    requires <other-module-name>;
}
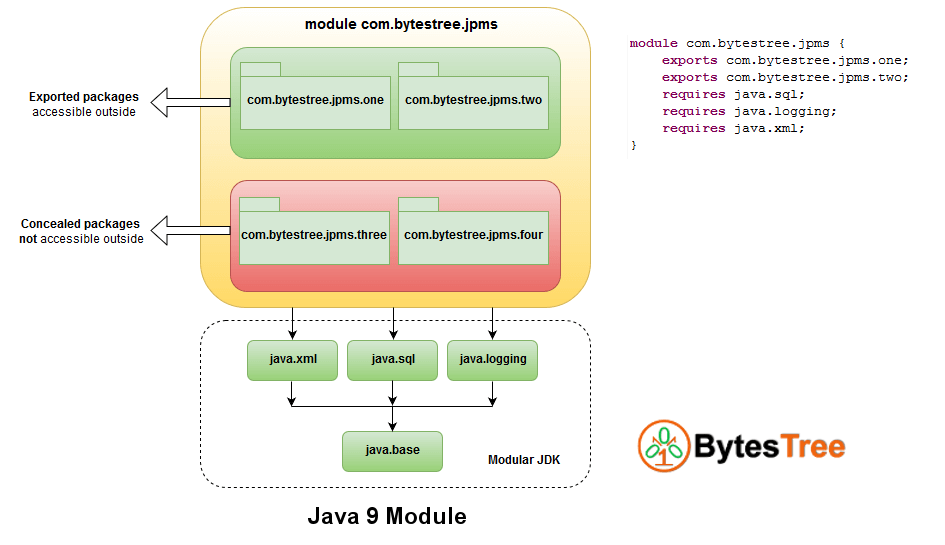
Below is a diagram of a typical module which has two exported packages and two concealed packages. It also uses(requires) three modules from JDK:
How to create and use modules
Enough about theory, now ready to get your hands dirty with code. Let’s create a simple calculator application using modules. We will be creating two modules here:
- Module com.bytestree.maths which perform the addition operation
- Module com.bytestree.calculator which uses above module
How to Create Java 9 Modules using Eclipse
If you are more comfortable with IDE like Eclipse rather than the command line and simple text editor, then please refer below video on How to Create Java 9 Modules using Eclipse.
If you want to know the command line way of creating module, then continue here OR jump to Advantages of Modules
The folder and file structure for above modules is as follows:
\---module-demo
    \---src
        +---com.bytestree.calculator
        |   |   module-info.java
        |   |
        |   \---com
        |       \---bytestree
        |           \---calculator
        |                   Main.java
        |
        \---com.bytestree.maths
            |   module-info.java
            |
            \---com
                \---bytestree
                    \---maths
                            Addition.java
Step 1
Create module-info.java for com.bytestree.maths module. We will be having only one package com.bytestree.maths in this module. Other module will require classes in this package, so we should export it.
module com.bytestree.maths {
    exports com.bytestree.maths;
}
Step 2
Create Addition.java in com.bytestree.maths package. This class will perform the actual addition operation.
package com.bytestree.maths;
public class Addition {
	public static int add(int i, int j) {
		int result = i + j;
		System.out.println("Addition of " + i + " and " + j + " is : " + result);
		return result;
	}
}
Step 3
Create module-info.java for com.bytestree.calculator module. This module requires Addition.java from com.bytestree.maths module for its operation.
module com.bytestree.calculator {
        requires com.bytestree.maths;
    }
Step 4
Create Main.java in com.bytestree.calculator package. import Addition class and use it to add two parameters passed in command line.
package com.bytestree.calculator;

import com.bytestree.maths.Addition;

public class Main {
	public static void main(String[] args) {
		System.out.println("Going to add " + args[0] + " and " + args[1]) ;
		Addition.add(Integer.parseInt(args[0]), Integer.parseInt(args[1]));
	}
}
Step 5
Compile both modules and run the program. All compiled classes will go in module-demo/mods directory. Note the module-path argument while compiling com.bytestree.calculator module.
>javac -d mods/com.bytestree.maths src/com.bytestree.maths/module-info.java src/com.bytestree.maths/com/bytestree/maths/Addition.java

>javac --module-path mods -d mods/com.bytestree.calculator src/com.bytestree.calculator/module-info.java src/com.bytestree.calculator/com/bytestree/calculator/Main.java

>java --module-path mods -m com.bytestree.calculator/com.bytestree.calculator.Main 2 8
Going to add 2 and 8
Addition of 2 and 8 is : 10
That’s it. We successfully created two modules in which one module uses a class from an exported package of another module.
Want to check the strong encapsulation in java 9? Try commenting “exports” from module-info.java of com.bytestree.maths module and re-compile both modules. You will get following error at compile time.
src\com.bytestree.calculator\com\bytestree\calculator\Main.java:3: error: packag
e com.bytestree.maths is not visible
import com.bytestree.maths.Addition;
                    ^
(package com.bytestree.maths is declared in module com.bytestree.maths, which
does not export it)
1 error
A thing to notice here is, Addition class is public, but we cannot use it unless we export the package in which it is present. Hence strong encapsulation really worked here 🙂
Advantages of Modules
- Strong encapsulation is a major advantage of the module system. As “public” is no longer accessible to everyone. With module system, we can allow a limited set of packages to be accessible to outside application.
- Makes your application lightweight, so can be run on more number of devices.
- As it is lightweight, it improves the performance of an application.
- Architecture that allowing you to split your application into external packages and concealed packages, hence easy to follow separation of concern principle.
- Some internal classes in packages like sun.security.* , com.sun.crypto.* are no longer accessible as these packages are now concealed, therefore improves security.
Migrating to Modules
You may have got excited about modules in Java 9 and want to convert your existing Java application to a modular application. What if your application uses third-party libraries and they are not yet migrated to the modular system. The good news is we don’t have to wait for third-party libraries to migrate to the modular system. JPMS provides Automatic Modules feature for the same reason.
An Automatic Module is a module whose declaration is inferred by module system from a traditional jar that you have placed on module-path. You don’t have to make any changes in those third party jars, but you can still use them as modules. Name of these modules is derived from jar file name and it exports all the packages within it. So automatic modules do following things:
- Allows traditional jars to use as modules
- Derive module name from name of jar file
- Exports all packages in the jar irrespective of their intent of use
- Requires all other modules in your application
That’s all about modules for now. Hope this gives you required heads up to start building a modular application.